First of all here is a list of materials you will need for this project:


Step 3
Cut out enough fabric to cover the false bottom. Cover the batting and glue fabric to cardboard. Do the same for your stitched piece and the top lid.

Step 4
Cut a strip of fabric to go around the outside of the lid. I press one end of the fabric under 1/4 inch. This allows for a nice straight edge to line up the bottom of the lid with the fabric. I also do this at the end of the fabric so no raw edges will be seen.

Step 5
Glue the fabric down to the top of the lid.

Step 6
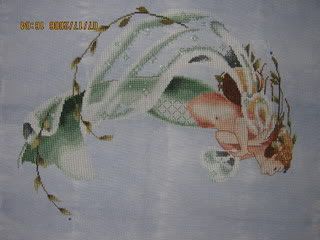
Center stitched piece on cardboard and glue down. Glue the stitched piece to the top lid. I usually place a heavy (but not to heavy!) book on top to press together and let dry for a few hours.

Step 7
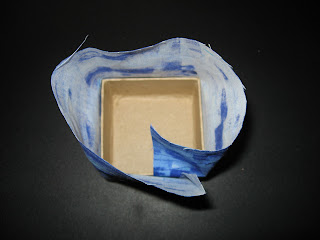
Cut a piece of fabric big enough to cover the inside AND outside of the box. I start mine by placing the fabric about 1/2 overlapping the bottom of the box and I press the fabric down as I turn the box in my hands. Once that is done then I glue the extra fabric down on the bottom of the box. You should have enough fabric extra to tuck the fabric down and glue to the inside of the box.
Step 8

Step 9
Insert false bottom into the box.

Step 10
Cut a piece of fabric big enough to cover the bottom of the box. Glue down. I like to take a small (and I mean just a tiny amount!) amount of glue on my finger and run it all the way around where the sides meet the bottom.

At this point I let the whole thing dry for a few hours and then I can add my ribbon and/or cording to make it pretty. :)

I hope this is helpful to everyone! :)


18 comments:
Nice tutorial; thank you :)
Excellent! I look forward to making my own :)
He's adorable!
What a wonderful tutorial. Thanks for posting. I think I can, I think I can! FT is so cute.
great tutorial :) I will try it as soon as I find a matching box :)
Thank you for the tutorial I will be back to look as I do one.
Fantastic tutorial DAwn. Thank you so much. I must try one.
Thanks for the tutorial. Your piece came out great ;)
Thanx for your comment on my page, I also like to show you what I stitch :-)
I must say I like your tutorial very much, it is pretty done and easy to follow .-)
Thank you for an excellent tutorial, Dawn! Your box is too cute!
Thanks for the tutorial, it seems so easy to follow, cant wait to make one. Nice finish, btw.
Well done, Dawn!! Thanks fore sharing.
Great tutorial-thank you.
Jen
Thanks for sharing Dawn!
Thanks for the tutorial Dawn!
What a wonderful tutorial, very clear. Other than framing and tuck pillows I really haven't tried any other types of finishing. However, I can think of a couple of pieces that finishing like this would be wonderful for.
Thanks for posting the picture of the Stony Creek leaflet. It did have a lot of fun projects (the cat one was my favorite, but the hat and the apprentice saying is up there too). I think I have another one to add to my wish list. Harvest Witch will be gorgeous when she's done.
Sue
Great tutorial! I'll have to try my hand at one of these. Thanks!!
Hope you don't mind, but I've added your tutorial to the tutorial links on the Focus on Finishing blog :) It's a great tutorial :)
Also, congrats on the pregnancy news - hope all goes well, and it's a nice uneventful pregnancy {{hugs}}
Post a Comment